Rotisserie Style Whole Chicken in the Instant Pot!

Photo Credit: Lemon Blossoms Blog

Photo Credit: Lemon Blossoms Blog

This Whole Rotisserie Style Chicken is one of my favorite quick and easy weeknight meals. The meat comes out juicy, tender and flavorful every time!

It’s so simple too! Anyone can do it!

It can be cooked fresh or frozen, giving me no excuses for a healthy homemade meal. Lets be honest, sometimes I don’t plan ahead enough to grab something out of the freezer to thaw for dinner that night. Problem solved!

So here is what you need to make this Rotisserie Style Whole Chicken!

IMG_7630.JPG

Ingredients:

  • 1 (4-5 pound) Nourished With Nature whole chicken

  • 3 Tbsp olive oil

  • 1 Tbsp paprika

  • 2 tsp garlic powder

  • 1 tsp onion powder

  • 1 tsp dried thyme

  • 1/2 tsp dried oregano

  • 2 tsp salt

  • 1/4 tsp ground black pepper

  • 1 cup chicken broth

Instructions:

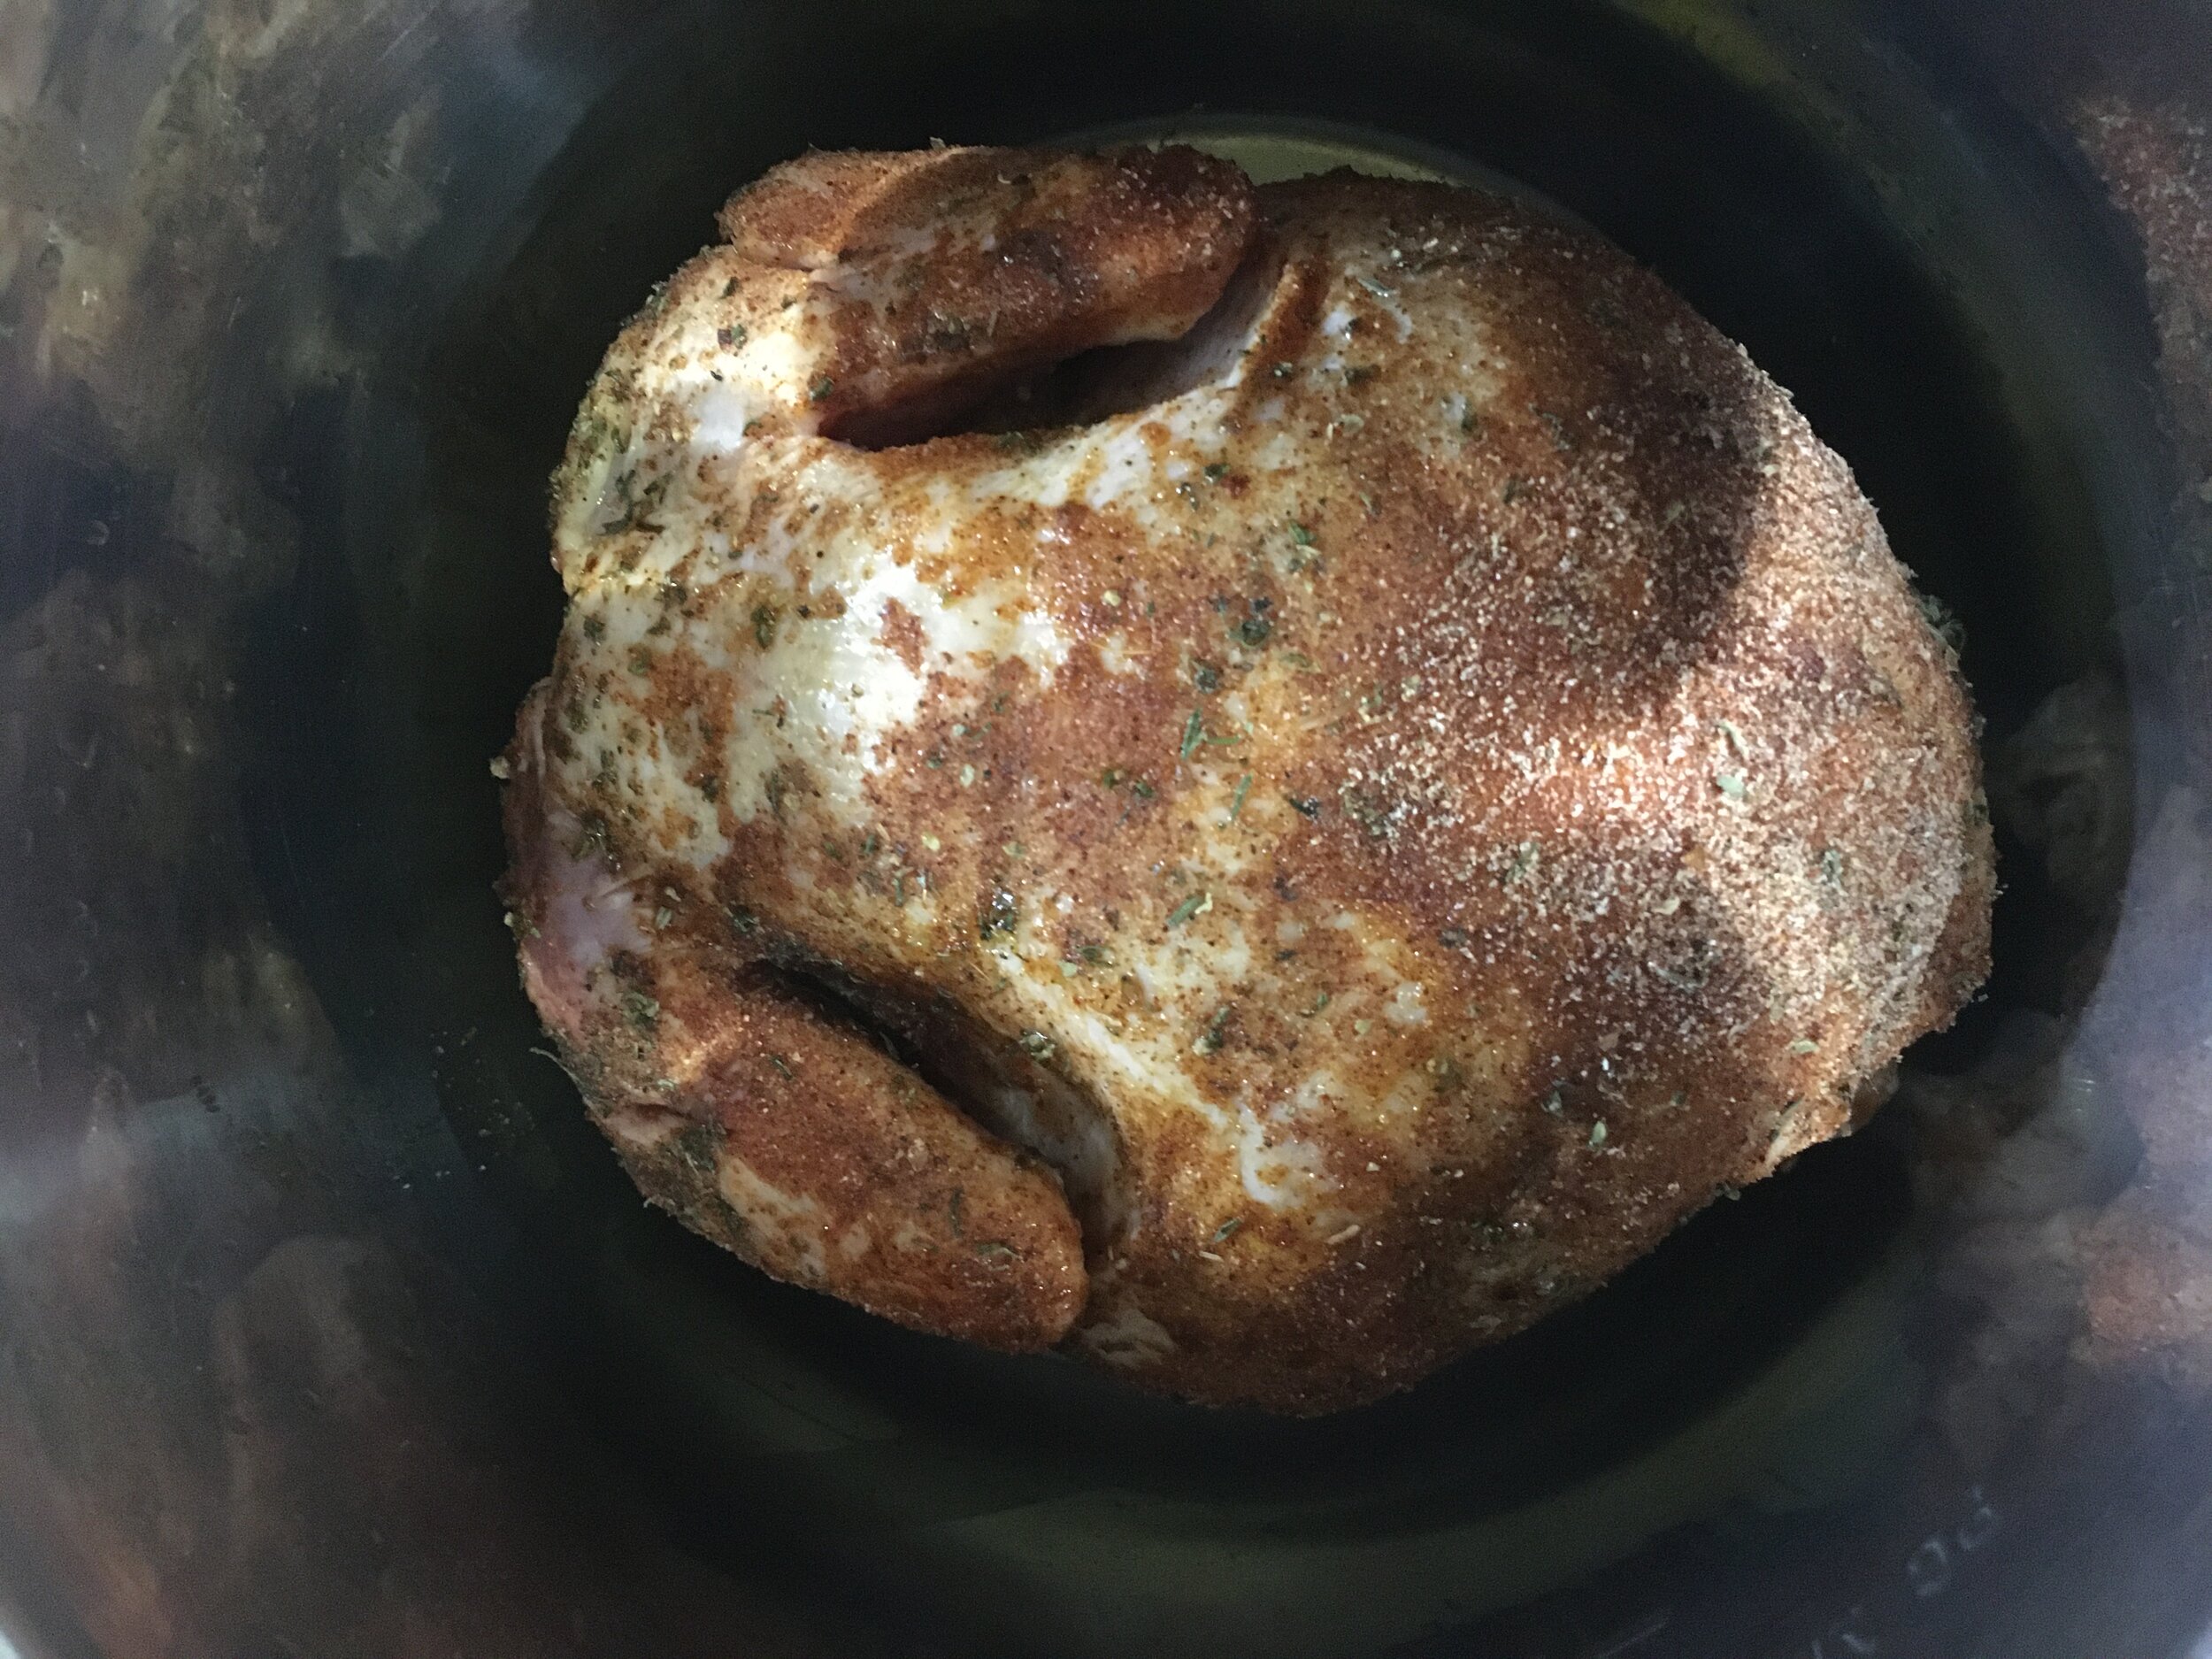
  1. Combine your spices in a small bowl: paprika, garlic powder, onion powder, thyme, oregano, salt, pepper

  2. Loosen the skin on the chicken by gently lifting and pulling it off the meat. Rub 1 Tbsp olive oil and about 1/3 of the spice mix under the skin and massage with your fingers to spread evenly. Next rub another 1 Tbsp olive oil and the rest of the spice mix over the outside of the chicken. If your chicken is frozen try soaking it in a big bowl of hot water, changing out the water a couple times when it cools down. This will thaw your bird enough to loosen the skin at least.

  3. Turn on your Instant Pot to Saute mode and add the last 1 Tbsp Olive Oil to the bottom. When it’s sizzling hot drop the chicken in breast side down and brown it for a couple minutes. This step is optional if you don’t want to take the time or if your bird is frozen.

  4. Turn off the Instant Pot, remove the chicken and place on the trivet wire rack that came with your machine, breast side up.

  5. Add the chicken broth to the bottom and deglaze the crispy bits that are stuck on with a wooden spoon.

  6. Lower the trivet back down into the Instant Pot and close the lid, set valve to “seal”

  7. Cook on high pressure using the time tables below.

  8. When done, let the pressure release naturally for 15 minutes, then do a quick release to get rid of any remaining pressure.

  9. Open the lid and remove the chicken.

  10. For extra crispy skin, you can broil the chicken in the oven for 4 to 5 minutes.

 
IMG_7635.JPG
IMG_7637.JPG
IMG_7638.JPG

Having a Whole Rotisserie Chicken cooked is convenient for whipping up Chicken Enchiladas, White Chicken Chili, Chicken Tortilla Soup or Chicken Tacos. The diced meat is even great on a Southwestern Salad. The juices left in the pot after cooking make the BEST homemade Enchilada Sauce too!

You don’t have to stretch it out though, you could have a breast and thigh along with a side of baked sweet potatoes and a creamy coleslaw. Mmmmmm…..

Photo Credit: Lemon Blossoms Blog

Photo Credit: Lemon Blossoms Blog

***It’s also worth mentioning that this can be cooked in the oven if you haven’t yet entered into the world of the incredible Instant Pot***

Cooking Times for Instant Pot Whole Chicken

Thawed or Fresh Chicken

  • A 3 – pound chicken will need 18 minutes of High Pressure Cooking Time with a 15 minutes Natural Pressure Release.

  • A 3.5 – pound chicken will need 22 minutes of High Pressure Cooking Time with a 15 minutes Natural Pressure Release.

  • A 4 – pound chicken will need 24 minutes of High Pressure Cooking Time with a 15 minutes Natural Pressure Release.

  • A 4.5 pound chicken will need 27 minutes of High Pressure Cooking Time with a 15 minutes Natural Pressure Release.

  • A 5 pound chicken will need 32 minutes of High Pressure Cooking Time with a 15 minutes Natural Pressure Release.

Frozen Chicken

  • A 3 – pound chicken will need 39 minutes of High Pressure Cooking Time with a 15 minutes Natural Pressure Release.

  • A 3.5 – pound chicken will need 46 minutes of High Pressure Cooking Time with a 15 minutes Natural Pressure Release.

  • A 4 – pound chicken will need 52 minutes of High Pressure Cooking Time with a 15 minutes Natural Pressure Release.

  • A 4.5 pound chicken will need 59 minutes of High Pressure Cooking Time with a 15 minutes Natural Pressure Release.

  • A 5 pound chicken will need 65 minutes of High Pressure Cooking Time with a 15 minutes Natural Pressure Release.

This recipe was adopted from Lemon Blossoms Chef Kathy

Tasty Chicken Tortilla Soup

This recipe is so tasty and quick for those nights when you don’t want to dirty a million pots!

Nourishing, filling and warming, perfect for a homemade dinner around the table with your family!

Ingredients:

  • 4 Nourished With Nature Chicken Breasts

  • 6 cups Chicken Broth

  • 2 cups salsa

  • 1 quart stewed diced tomatoes

  • 2 tsp cumin

  • 2 cups organic corn

  • 1 cup fresh cilantro chopped

  • Diced avocado, lime wedges and grated cheddar cheese to garnish

Instructions:

  1. Salt and pepper whole chicken breasts and cook in a large cast iron style pot. I love my knock off LaCruset pot for this soup!

  2. Shred the chicken, then in the same pot add your chicken broth, salsa, cumin, corn, stewed tomatoes and simmer for 20-30 minutes.

  3. Serve with organic corn chips, garnish with shredded cheese, avocado slices, lime wedges and cilantro.

  4. Enjoy!

IMG_6646.JPG
IMG_6647.JPG

Healthy Homemade Sweet and Sour Chicken

You can skip the take-out from here on out! This homemade version is so much healthier and a million times tastier!

Sweet and Sour Chicken is one of my favorite Asian-American dishes but since I’ve retrained my taste buds I realize that things “taste good” when they are loaded with sugar. And this dish from restaurants is no exception. So for this version I’ve swapped out the sugar for honey and it is just as AMAZING!

IMG_5769 (2).JPG

Ingredients:

  • 2 Nourished With Nature Chicken Breasts, skin removed and cut into 1-inch chunks

  • Redmond Sea Salt and fresh ground pepper to taste

  • 1/2 cup Arrowroot Powder (as cornstarch substitute)

  • 2 Nourished With Nature Pastured Eggs, beaten

  • 1/4 cup Nourished With Nature Pastured Pork Lard

  • 1 orange and 1 red bell pepper cut into 1-inch pieces

  • 1 white or purple onion cut into chunks

  • 1 whole pineapple cored, peeled and cut into 1-inch pieces

    FOR THE SWEET AND SOUR SAUCE

  • 1 cup of raw local honey

  • 1 cup apple cider vinegar

  • 1/2 cup ketchup

  • 2 Tbsp Coconut Aminos (as soy sauce substitute)

  • 1 tsp garlic powder

Sweet and sour sauce makings: homemade ketchup, garlic powder, coconut aminos, apple cider vinegar and honey.

Sweet and sour sauce makings: homemade ketchup, garlic powder, coconut aminos, apple cider vinegar and honey.

Instructions:

  1. Preheat oven to 325 degrees F. Lightly coat a 9x13” baking dish with lard

  2. To make the sauce, whisk together the honey, vinegar, ketchup, coconut aminos, and garlic powder in a small saucepan over low heat. Once honey has dissolved remove from heat and set aside.

  3. In a large bowl season chicken with salt and pepper, to taste. Stir in arrowroot powder and gently toss to cover. Working one at a time dip the chicken into the eggs.

  4. Heat large in a large saucepan over high heat. Add chicken and cook until golden brown, turning to cook all sides. Transfer to the prepared baking dish.

  5. Combine chicken with peppers, onions and pineapple. Top with sweet and sour sauce. Place in oven uncovered and bake until the sauce has thickened, about 55 minutes. Turn chicken and veggies about half way through so that the sauce coats evenly.

  6. Enjoy right away over organic brown rice or all by it’self!

Cube the chicken.

Cube the chicken.

Salt and pepper the chicken then toss with arrowroot powder.

Salt and pepper the chicken then toss with arrowroot powder.

Dip each piece of chicken in egg, brown in a medium saucepan, turning once or twice to cook all sides.

Dip each piece of chicken in egg, brown in a medium saucepan, turning once or twice to cook all sides.

Dice up bell peppers and onion, get ready to add pineapple, chicken and sauce…

Dice up bell peppers and onion, get ready to add pineapple, chicken and sauce…

As you can see it’s so customizable! Sometimes white onions, sometimes purple. You could even swap out the bell peppers with carrots or sweet potatoes. Enjoy!

As you can see it’s so customizable! Sometimes white onions, sometimes purple. You could even swap out the bell peppers with carrots or sweet potatoes. Enjoy!

Never Fail Pie Crust using Pastured Pork Lard

If you’re like me, homemade pies are one of my favorite things!
I am a crust lover.

I am a firm believer that your crust either makes your pie a huge SUCCESS or makes it just so-so.

Soggy crusts are not okay, bland crusts are yukky, it’s no wonder some people aren’t a fan!

This crust is crumbly, melt in your mouth and slightly sweet.

lattice+pie

You can use this crust for a pumpkin pie, apple pie or even a chicken pot pie.

There are about as many homemade pie crust recipes out there as there are pairs of shoes, so I’ve done the hard work for you in finding the perfect one.

There is no kneading or flouring your surface for this recipe.

You won’t have to worry about the dough tearing, because it can just be pressed back together.

This could be a “pat in the pan” recipe, no rolling pin needed.

So if you get frustrated with the shape, just start slapping it into your pie dish and press it to the sides with your fingers.

But, if you follow my instructions below, you just simply mix, roll and bake.


And if you hear the word “lard” and tend to shy away because you think it’s not healthy I challenge you to think again. Healthy fats DO NOT MAKE YOU FAT!

To brush up on 7 Healthy Reasons to Eat Lard check out this blog post.

This lard is from our very own pigs raised in our oak forest and finished on acorns.

So come by our farm store this week or catch us at the Corvallis Farmers Market on Saturday and pickup some lard for this recipe!

Here we go:

This makes a double recipe for two pumpkin pies or one covered pie.


Ingredients:

  • 1 1/2 cup Nourished With Nature Pastured Pork Lard (room temp)

  • 1/2 cup boiling water

  • 2 Tbsp milk

  • 4 Tbsp sugar (optional)

  • 1/2 Tbsp salt

  • 4 cups flour

Instructions:

  1. Put lard, milk and sugar into a mixing bowl with whisk attachment (KitchenAids work great)!

  2. Pour in boiling water.

  3. Whisk on medium speed until all water is mixed into the lard, 2-3 minutes.

  4. Switch to your dough hook or paddle attachment.

  5. Sift salt and flour together and add to the lard mixture, stir until blended.

  6. Divide dough into two pieces.

  7. Place dough in-between two large pieces of wax paper and using a rolling pin, roll out to the size pie crust you need. Make it about two inches larger than your pie plate so you have enough crust to come up the sides.

  8. The dough will be quite soft and sticky, which means you’re not going to be able to lift or maneuver it much with your bare hands. Remove the top piece of wax paper and flip your pie crust into your pan using the bottom piece. Then peel off the wax paper. You can press or shimmy your crust into the corners. It’s very forgiving if it tears you can just press it back together.

  9. Repeat rolling out the dough with your second half if you are making a covered pie such as an apple or berry. This time slide the dough, still in between the wax papers, onto a cookie sheet and refrigerate for 20-30 minutes until firm. A little firmer dough will allow you to cut strips for a lattice top or use cookie cutters with leaf designs if you’re feeling super fancy.

  10. If making a covered pie trim off any excess dough and pinch the top and bottom together. I use my index and thumb fingers of one hand and my index finger of the other to press the dough between to make the wavy edge. You could even just use a fork and press a design into the edges, sealing the top and bottom together.

berry pie2.JPG

Lattice top pies do not need to vent, the juices will bubble up through each little slit.

Completely covered pies, like this marionberry pie, need to vent. I just happen to have this cute little birdie, given to me by my mom whos cousin gave it to her before I was born, made just for the occasion!

You can also just cut 4-5 slits in a circular design to allow for venting.

berry+pie.jpg

Pro Tips for Baking

If you are making a custard type pie with a liquid filling such as lemon meringue, pecan or pumpkin pie, prebaking the bottom crust is recommended so that your crust is not soggy.

  1. Line the bottom crust with parchment paper, flaring it over the crust edge like an awning, to keep from overbrowning. Fill with dry beans or rice to the very top or bank the beans against the sides if you don’t have enough to fill to the brim. This will prevent shrinkage and help the crust keep it’s shape when baking.

  2. Bake for 20 min at 400F with the weights in place. Carefully lift the weight out and prick the pastry with a fork all over, then return to the oven to finish baking 5-10 minutes or until golden brown.

  3. Check the pastry periodically and if it puffs up, prick with a fork and gently press down with the back of a spoon.

  4. If you are filling the crust with an uncooked mixture that requires further baking whisk together:

    • 1 Egg Yolk

    • 1 Tbsp water

    • pinch of salt

  5. Brush this mixture all over the inside of the crust and return to the oven until the egg glaze sets 1-2 min. Fill the shell when it’s still hot or let it cool as the recipe specifies.

The time you spend on making a homemade pie crust will be SOOOOOOOOO WORTH IT!

It’ll taste delicious, you will know the ingredients you used and you’ll feel proud to lay it on the table at your next holiday gathering!

Swing by our farm store this week or catch us at the Corvallis Farmers Market on Saturday and pickup some Lard so you can make these Never Fail Pie Crusts for the holidays.


Source -Joy of Cooking by Irma S. Rombauer, Marion Rombauer Becker and Ethan Becker

What do I get with a half hog?

I am so grateful you are interested in where your food comes from!

I am so impressed that you are taking a stand for sustainable food and happily raised animals!

As icing on the cake I want to remind you that our animals never receive:

  • artificial growth hormones

  • any corn or soy in their feed

  • any vaccinations

  • routine antibiotics (occasionally to save a life we might use them as a last resort after homeopathic supplements and essential oils and then sell that meat in a different place or fully disclose it).

As a valued friend and farm supporter we want you to know how to save money by buying in bulk. I want you to feel like all your questions are answered and you have a good grasp on what it means to buy a half or whole hog.

After you read all the way through and you feel like a half is still too much you can always find a friend or family member to split a it with.

>>>  Make your reservation here  <<<

For reference a half hog will usually last a family of two for about a year if you also eat chicken, beef and lamb.

When you buy a half or whole hog with enough lead time you can customize what cuts you want.

Take a look at this pie chart for how much of each cut you would get with standard cutting and wrapping:

pork pie chart picture.jpg

As you can see from this the ham, loin and shoulders make up 75% of all the meat you get. So if you usually like to grab 1 pound packages of sausage for quick weeknight meals you might want to grind some of the shoulder roasts or hams into sausages.

Or if you are a bacon loving family you could turn the loin into Canadian Bacon in addition to the belly bacon, since belly bacon alone is only about 10% of your meat.

Here are more ways you can customize:

Belly Bacon

  • can be smoked and cured

  • can be kept as fresh side and you can do your own smoking and curing

  • can be sliced like bacon or diced

  • can be flavored regular, peppered or sage (sugar free)

Ground (Sausages)

  • can pick any two per half hog

  • can be kept as unseasoned

  • can be made into Breakfast Sausage ground or links

  • can be made into Bratwursts links

  • can be made into Italian Sausage ground or links

  • can be made into Andouille links

  • this is a pretty small portion so if you find yourself reaching for 1 pound packages that quickly defrost often, I would suggest grinding some of your shoulder or ham roasts.

Picnic (Lower Shoulder Roast)

  • can be ground and added to the sausages portion

  • can be kept as roasts and slow cooked for pulled pork

Butt (Upper Shoulder Roasts)

  • can be ground and added to the sausage portion

  • can be kept as roasts just like the picnic

  • can be sliced and cured as Cottage Bacon

  • can be cut into country style ribs

Photo Credit Amazingribs.com

Photo Credit Amazingribs.com


Loin

  • can be kept whole as a loin roast

  • can be smoked and cured made into Canadian bacon

  • can be made into boneless or bone in pork chops

  • can be made into smoked pork chops

  • if you choose bone-in pork chops, baby back ribs are not an option because they use the bone. If you want baby back ribs choose boneless pork chops.

Ham

  • can be smoked and cured to make ham roasts, any size, bone in or boneless

  • can be smoked, cured and sliced to make ham steaks

  • can be left uncured for roasts

  • can be ground and added to the sausages

Spareribs

  • can be kept or deboned and ground

  • can have the rib tips cut off to make St. Louis Ribs

Ham Hocks

  • can be smoked and cured for soups

  • can be kept fresh

  • can be deboned and ground into sausages

Bones and Edible Organs

  • optional for broth making, loading up on your iron or raw dog food

  • includes options of heart, kidney, tongue, liver, ears

So many options for getting the cuts of meat you'll use most find the highest value in!


No more getting stuck with huge hams in your freezer that you never find the time to cook!
You can honor the animal by utilizing every cut and customizing it, PLUS save money by buying in bulk!

Click here to reserve your pork with a deposit.


Please reach out if you have any questions! I'm here to help you make the best decision for what works for your family!